
A guide to making a six-hook fishing float at home, cheaply and economically

A. THE IMPORTANCE OF FISHING FLOATS
Before explaining how to make a six-hook float rig, let me just reiterate the importance of the float so that we all remember.
How do you catch fish? The answer lies in the movements of the fishing float, which help us determine and judge whether a fish has taken the bait. As such, the fishing float is a particularly important piece of fishing tackle. Anglers are often patient people, as they have to sit still for hours, intently observing the movements of the float, analysing those movements and reacting immediately.

B. STRUCTURE OF A SIX-PART
FLOAT
A six-part float typically consists of four main parts:
- The float body
- Float stem
- Float cap
- Float stem and, in addition, the float stem attachment.
a. Float body
Typically, float bodies are made from materials with a lower density than water, such as compressed foam, li-e wood, cottonwood or balsa wood, so that they can float on the water. Depending on the size of the rod and the angler’s intended use, the float body may be large or small, but it is always teardrop-shaped.

b. Float rod
This part is usually made from fibreglass rods; you can use the first section of a hand rod available at fishing tackle shops. In my personal experience, this type is quite durable, straight and has a small cross-section. Electric float rods also use this material as the core, with copper wire wound around the rod, covered with a protective layer of resin or reinforced with thread and coated in resin.
c. Float cap
This part is made of foam and comes in a wide variety of shapes.
d. Float base
The float stem is usually made from a fibreglass rod. It is tapered at the end to fit into the float mounting mechanism. The float stem of offshore floats is made from a round metal rod encased in a layer of lead to achieve the appropriate weight when balancing the float. Furthermore, the float stem is fitted with a ring for attachment to the running float mounting mechanism.
Once you have grasped some of the simple general characteristics of fishing floats, you will find it easier to create a float to your liking.
C. STEPS FOR MAKING A FISHING FLOAT
Step 1. Making the float body
To get started, you need to read the instructions for making a hexagonal float carefully; first and foremost, you need to choose suitable materials. People usually use foam from old fridges, foam from aircraft wrecks (scrap), or insulation foam from old aid-supplied corrugated iron sheets, as these are very rigid and have high buoyancy.

Once you have selected the material, you can begin the rough shaping of the float. Personally, I only need a hand-held drill. Thread the float’s stem through the piece of foam you intend to shape, then secure it in the drill. Next, use coarse sandpaper (the kind used for polishing at a joinery shop) to shape the foam into the desired float shape.
Step 2. Wrapping the float with thread
Once you’ve sanded it into the shape you’re happy with, it’s time to start wrapping the thread around the float. You need to wrap the thread to ensure the float is durable, watertight and… looks good. This is a stage that requires precision. You mustn’t let the layers of thread overlap.
To ensure this, after wrapping a few turns, remember to apply a drop of 502 glue immediately to secure the thread, otherwise it will come loose. Once you have finished wrapping the thread, apply glue to cover the entire float. In this way, the colour of the float is determined by the colour of the thread. If you like a particular colour, simply choose thread of that colour and you’ll have your very own float.
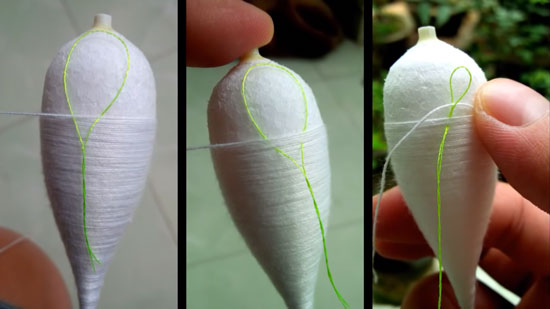
Step 3. Making the float body
To make the float more sturdy and rigid, and easier to tie onto the fishing line, you’ll need to make a body for the float; you can use a bicycle spoke for this.

Then cut off the curved end of the bicycle spoke and use a plastic tube from a child’s lollipop to fit inside the spoke
Step 4. Polishing the float
Once you have wound the thread and applied the glue, it is time to give the float a finish. Your float may be structurally sound and functional, but it will look rather rough if not cleaned and polished. To polish it, reattach the float to the drill and run it at a moderate speed.
Next, use a fine-grit wet sandpaper to smooth out any rough patches caused by the glue and thread. Once it has reached a basic level of smoothness, remove it and apply a thin layer of glue over the entire float. Continue sanding with finer-grit sandpaper, dipping it in water as you go, until the float feels completely smooth to the touch.

If you’re particularly careful and meticulous, apply another layer of glue and sand again; at this stage, the float will have a moderate sheen. For an even better shine, use a piece of thick velvet or denim fabric and polish until it gleams. In my experience, this only takes 1–2 minutes; it all depends on how much shine you want.
Step 5. Leave the buoy to dry thoroughly
Once the float has been polished again to ensure it looks its best, we’ll take it out to dry.

Additionally, if you’re looking for an even more refined finish, you can apply a thin coat of nail varnish to the float, sand down any rough patches, apply another layer of 502 glue and polish it again; this way, from the outside, it will look almost like a wooden float... You’ll end up with a top-quality, beautiful, glossy and smooth float…
POINTS TO NOTE WHEN MAKING A FISHING FLOAT
As well as the instructions for making a six-hook float, you should be aware of the following points to bear in mind. Depending on your intended use, there are floats for daytime and night-time fishing. Generally speaking, the method is similar to that described above; however, there are a few points you need to bear in mind, as follows:
1. Day-use floats
a. Top-of-rod floats
Six-point floats for topwater fishing usually have a small float body as they serve only two purposes: to signal a bite and to stabilise against waves (when required). As they are used for topwater fishing, the float cap is also small and sits close to the body. When making this float, you simply need to paint a few reflective stripes on the float rod to make it easier to observe the float’s movements.
Typically, this type is always used with a fixed float attachment. However, when fishing in deep water, it is advisable to use a sliding float attachment.
When fishing amongst water lilies or duckweed, we need to make a short float to allow for flexibility when placing the hook into the small gaps between the leaves. Consequently, this type features a short float rod and short float leg; the float itself is 8–12 cm long, so when making it, you should use a lightweight, flexible float leg attachment.
When fishing on open water with wind and waves, you should use a wave-resistant float with a slender, long float stem—sometimes up to 30 cm—and the entire float can be as long as 40 cm.
A small, oval-shaped float head helps reduce wind resistance. Additionally, you should ensure the float body is tapered and larger to allow for the attachment of a few extra lead weights to the float stem, helping the float remain more stable in wind and waves.
b. Offshore fishing
Offshore floats have an additional function that near-shore floats do not: they act as a support to help the hook rise straight when the line is jerked. To achieve this, the float needs to be large and heavy. If you wish to make this type of float, you will need to add a great deal of lead to the float’s stem. The further and deeper you fish, the larger and heavier the float needs to be. The float body is usually very large, sometimes bigger than a duck’s egg, with a diameter of up to 5 cm.
When making this type of float, there is one very important step: you need to ‘balance the float’ before you go fishing. Usually, each hook size is suited to a specific float size.
To balance the float, first you’ll need a 5-litre bottle of cooking oil, with the narrow neck cut off. Next, fill it nearly to the brim with water, drop the float in and balance it. You need to adjust it so that the float sinks almost completely, leaving just 1 cm between the bottom of the float and the base of the float rod. Next, attach the hook to the float’s stem and lower it into the bottle of water; if the float floats, you’ll need to add more lead; if it sinks too quickly, you’ll need to remove some lead.
The weight of the float also makes it easier to cast the hook, as you are essentially casting the float rather than the hook itself. Furthermore, because the float’s weight is concentrated at its base, the float itself resists waves very well when cast far from the shore.
A large, heavy float helps to eliminate nicks from small fish, preventing interference for the angler.
2. Night-fishing floats
The darkness of night reduces the angler’s visibility, making judgement and reaction times slower and less accurate. For this reason, the most fundamental difference between making a night float and a day float is the creation of light.
- There are several ways to create a night float; most use a specialised type fitted with a battery and a light bulb. This comprises a battery compartment that can be detached from the float body. This type is very bright and has a long burn time. Whilst convenient, it is expensive. You should therefore consider this carefully when making one.
- The second method involves using a daytime float as is, but attaching a light stick when fishing at night. Although this is more economical, it is rarely used in practice as it is unattractive and impractical, hindering your reaction time when setting the hook.
Thus, depending on different usage requirements, we can make suitable fishing floats based on the general guidelines and methods I have outlined.
Making a six-section float is not difficult at all. With a little skill and care, you’ll be able to make one. And with the guide to making a six-section float provided above, I hope you’ll be able to create floats to your liking, each with your own unique style.
Buy fishing tackle at Tuấn Kiệt’s shop on Shopee:


